Tuesday, July 19, 2011

Router Update

In case anyone is actually interested in reading about my new cooling system on my router I thought I’d post an update.

It’s been running for a couple days now and things seem to have improved.  The stability of my wired connections has improved quite a bit.  I used to have significant hiccups when browsing or watching Netflix and while things are definitely a bit herky-jerky they don’t cause timeouts all the time like they used to.

Also, I haven’t had the problem with the router rejecting new wifi connections like it used to.  That is probably the best thing about the whole project.  I was thoroughly annoyed about having to go and restart the router every other day or so when it decided to stop letting wifi devices connect.

Lastly, I think that Netgear wants you to mod your router.  Seriously.  Check out the cool tabs they put on the rubber feet so they can be reattached after you take out the screws.  Companies that don’t want you to mod their stuff use glue, not fancy tabs Smile.

Router Fun Time 2011-07-16 029

Saturday, July 16, 2011

Turbo-Cooling My Router

Router Fun Time 2011-07-16 035

I’ve hated my router for some time now.  It’s really spotty, even with my wired connections.  It’s worst habit has been that is won’t let wireless devices connect, sometimes, just at random intervals it seems…  Anyhow, I hate it, I want to replace it-but my geek pride prevents me from buying anything that doesn’t have USB ports, and is Open-Source compatible-all of which seem to run around a hundred bucks.

I ran across a post where a guy modified some RAM heatsinks and put them on the ICs on the router board because he was having problems similar to mine.  He said it helped, I was inspired, geeky-fun-time ensued.

I started by pulling my router apart and checking for the telltale discoloring of overheating ICs:

Router Fun Time 2011-07-16 015

It was pretty clear that the IC on the left had been getting really hot, and the other one, at least a little bit.  I had an old 40mm fan left over from a motherboard I salvaged it from and decided it needed to go on the board but I knew it was not going to fit in the case…

So I set up to cut a hole in the top of the case for the heatsink and fan to stick out of.  Hoping I wouldn’t screw up and leave my router all ugly.

Router Fun Time 2011-07-16 008

I laid out the heatsink, and started drilling holes…  I used a sanding bit in my drill press and a couple of chisels to get it cleaned up as best I could.

Router Fun Time 2011-07-16 013

Of course, then I realized I needed a way to power the fan…  It runs on 12V, same as the router, so I figured the best way was to just jack into the power as it came in from the wall-wart:

Router Fun Time 2011-07-16 019

Then I needed to make a heatsink for the smaller IC.  I had another one lying in a defunct case from a PC I had stripped down a few weeks earlier.  So I saved it from the recycle bin and got out the roto-zip with the cutting wheel and chopped out a 1cm square.  I had to chop about 2/3 of the fins off.  Then I sanded off the rough spots and mounted it up:

Router Fun Time 2011-07-16 020

The larger one had this crappy adhesive pad on the bottom, so I just went with that.  The smaller one I stuck on with a glob of Artic Silver thermal compound.

Then it was just a matter of putting it all back together:

Router Fun Time 2011-07-16 033

I don’t have any hard data as to whether or not it’s making a difference, especially considering that I just finished up a few minutes ago.  I think it looks cool and I’m quite pleased with myself for completing it.  It seems like it should make a difference, especially in terms of stability.  I know heat is a major enemy of ICs, especially when they run nearly 24/7.

I love projects I can conceive of and execute within a couple hours.  I really like that the fan is quiet enough that I don’t really notice it over my computer.  I’ll post an update later when I have some more data as to whether or not I noticed a difference.

Tuesday, January 18, 2011

Why I left Facebook

It’s been a little over a week since I cut the cord and asked Facebook to delete my account forever.  I have to admit I really do miss it.  I miss knowing what my friends are up to without having to put any real effort into finding out.  I miss posting about my accomplishment or whining about something that went wrong and getting some support back from people.

I really like that I left though.  I feel more honest, like a better representation of who I am and want to be.  I mean, it’s a little silly to post links on facebook about how you shouldn’t be on facebook isn’t it?

My primary objection with facebook is a response to the nature of the business deal inherent to joining and using facebook.  In return for providing the facebook corporation with your personal information, your whereabouts, your habits, things you like and dislike, who your friends are and a myriad of other information you get to talk to your friends with little or not effort.  In reciprocation for your personal information you get to be lazy, a little more connected with people you generally don’t talk to, a little creepier than you want to be (the term ‘facebook stalk’ comes to mind), but generally, in my opinion, a bit lazy in comparison to the manner in which socialization and friendship are generally conducted.  I find this tradeoff to be unfair and biased towards the corporation.  I value the information I was sharing on facebook the same as I do any personal information.  We have federal laws about protecting our medical information, why not the bands we like or our pictures from last weekend?  Is one really more valuable or inherently personal than the other?  In sum, facebook gets too much in return for what they give me.

This leads me to my second major issue.  I think that our economy is not set up to deal with putting a value on a non-consumable good.  All the content (data) you generate on facebook can be mined, related to your friends data, and used in very powerful ways to target marketing towards you in an unrelenting effort to make us think less and buy more.  I think that people generally do not understand this and therefore undervalue their own information.  This is made abundantly clear to me when people give up their online privacy to find out what their ‘Stripper Name’ is, what ‘Sex and the City’ character they are, or whatever other asinine thing some insidious data miner has come up with to get access to you and your friends information.  Your data can be collected and resold an infinite number of times to whomever wants to buy it.  This commodity is fundamentally different than traditional consumable goods.  That fundamental difference is what drives the misunderstanding among the public regarding the value of their personal information and the data you create just by using the service.

There’s a reason facebook is “free and always will be” – it’s that your information is incredibly valuable and they’re getting the long end of the stick. 

Tuesday, January 11, 2011

I’m out.

Today I deleted my facebook account.  Forever.

I couldn’t take it anymore.  My primary frustration is with the commodification of personal information that is gathered from people who are (in my opinion) unwittingly providing a (soon to be publicly traded) corporation with their commodity as well as exposing themselves to dangers they are completely unaware of.

I think that our society has found itself in the midst of a revolution that it is unknowingly participating in and legally unprotected from.  At this point I’m struggling to articulate all the things I’m angry about but it seems the only thing I can do is stop participating.  So, I’m out.  Apparently, facebook is so appalled that I asked them to delete me that I have 14 days to consider my decision.  Perhaps I’ll work on articulating my reasons for leaving and express them here.  From this point forward, you can expect to find more posts here.

Tuesday, September 21, 2010

Mug Warmer Arduino Project

A few weeks ago I posted about building a mug heater that was controlled by an Arduino reading from some sensor values.  In this post I’m going to try and put together my notes and photos from the build project…

One of my first Arduino projects was to use a thermistor to sense the temperature of the warming plate and then change the color of an RGB LED accordingly.  The mug warmer project was certainly inspired in part by this initial testing – that and the fact that my coffee always gets too hot and I tend to leave the heater on when I leave the room (which I’m pretty sure is a fire hazard).

Here’s the Mug Heater in its current state, it’s fully operational and has been a nice addition to my desktop, I just haven’t had time to dress the wires properly and make it all look nice.
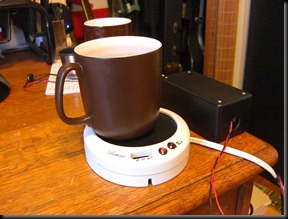
Mug Heater Project 2010-09-21 002

The project consists of four primary components.  The whole thing is controlled by an Arduino Pro (5V/16Mhz).  The power to the mug heater is controlled by another Sparkfun product that I really like – the Relay Control Board.  Here are two boards mounted in an enclosure I bought at the local Radio Shack when they went out of business:
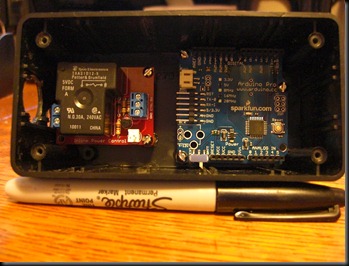
Mug Heater Project 2010-09-16 003I had to grind out some rather annoying mounting posts that were in the bottom of the enclosure so I could glue in some standoffs that fit the boards. The one nice thing is that the enclosure has vertical slots on the sides to hold perf boards – because I quickly realized that I would need a custom one of those.

So I busted out my trusty Dremel tool and cut out a piece of perf board to fit across the enclosure.  I had to cut out for access to the control and power supply ports on the relay board as well as to get around the screws that hold it in.  I was trying to keep the board as large as possible since I wasn’t really sure how much room I was going to need.

Mug Heater Project 2010-09-16 001

Two sensors, two LEDs, and the power switch are located inside the mug heater housing.  Each of these needed to be connected to one of the I/O pins on the Arduino.  All wired up the perf board looks something like this:

Mug Heater Project 2010-09-17 014

At this point in the project I hooked everything up and started testing the whole thing out…  Which led to this face:

Mug Heater Project 2010-09-17 006

Mug Heater Project 2010-09-16 008

There were several problems…  The most concerning was the weird power surge that kept causing my computer reset.  I had lots of problems with mounting LEDs and sensors.  (Bear in mind this is the first time I’ve ever built something that would be dedicated to one job and actually in an enclosure of some time so all of this was new…)  At this point I decided to take most everything I had done apart and start over.  I installed LED clips for the LEDs so they wouldn’t just be glued in place.  I soldered jumpers to the sensors and the LED pins so I could disconnect those wires more easily.  I also got the Dremel out again and cut out a large portion of the bottom and back of the mug-warmer enclosure in order to make the wire management bearable.  Some photos:

Jumpers attached to the photocell:
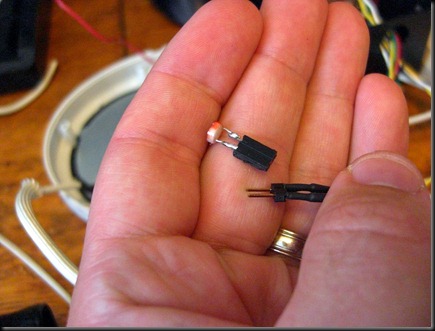
 

Mug Heater Project 2010-09-17 008

The cutout back so I can see what is going on and have room for all the wires:

Mug Heater Project 2010-09-18 004

I also re-glued the mounts for the Arduino and drilled a third hole in the enclosure so I could plug the FTDI in and upload new programs/get serial data on the computer with the board in the enclosure, this made my life much better!

Mug Heater Project 2010-09-17 013

In the above picture you can also see the nifty power connector I soldered on, because removable wires make me happy.

Mug Heater Project 2010-09-17 011

Here’s your reward for scrolling this far:

Also, the project code:

//Define LED Pin Numbers
int RED_LED = 3;
int GREEN_LED = 5;
int BLUE_LED = 6;
int BRIGHTNESS = 15;

// Define pin number that thermistor will be attached to
int TEMP_PIN = 2;

// Define pin number that the photoresistor will be attached to
int PHOTO_PIN = 0;

// Define pin number for relay trigger
int RELAY = 8;
boolean Relay_State = false;

// Temperature values for cutoffs
int HIGH_TEMP = 170;
int LOW_TEMP = 130;

// I copied this function from the Arduino tutorial on using a thermistor available at www.arduino.cc
// Whomever wrote it, it's fantastic and I thank you!
double Thermistor(int RawADC) {
  double Temp;
  Temp = log(((10240000/RawADC) - 10000));
  Temp = 1 / (0.001129148 + (0.000234125 * Temp) + (0.0000000876741 * Temp * Temp * Temp));
  Temp = Temp - 273.15;            // Convert Kelvin to Celcius
  Temp = (Temp * 9.0)/ 5.0 + 32.0; // Convert Celcius to Fahrenheit
  return Temp;
}

double getTemp() // I got sick of typing all this out every time I needed the temperature...
{
    return Thermistor(analogRead(TEMP_PIN));
}

boolean MugPresent() {  //Function returns a true value if the analogRead of the Photocell is less than 10, which based on my testing is a reasonable threshold...
  if (analogRead(PHOTO_PIN) > 10)
  { return false; }
  else
  { return true; }

}

void Debug()  // I hate typing things twice, this is convienient.
{
  Serial.println("DEBUG DATA");
  Serial.println(getTemp());
  Serial.println(analogRead(PHOTO_PIN));
  if (Relay_State == false)
    Serial.println("RELAY OFF");
  else
    Serial.println("RELAY ON");
}

void RelayControl() {
  if(getTemp() < LOW_TEMP && Relay_State == false)
  { digitalWrite(RELAY, HIGH); Relay_State = true; }
  else if(getTemp() > HIGH_TEMP && Relay_State == true)
  { digitalWrite(RELAY, LOW); Relay_State = false; }
}

void LEDColor() {
  if(getTemp() < LOW_TEMP)
  {
    analogWrite(RED_LED, 0);
    analogWrite(GREEN_LED, 0);
    analogWrite(BLUE_LED, BRIGHTNESS);
  }
  else if (getTemp() > LOW_TEMP && getTemp() < HIGH_TEMP)
  {
    analogWrite(RED_LED, 0);
    analogWrite(GREEN_LED, BRIGHTNESS);
    analogWrite(BLUE_LED, 0);  
  }
  else if (getTemp() > HIGH_TEMP)
  {
    analogWrite(RED_LED, BRIGHTNESS);
    analogWrite(GREEN_LED, 0);
    analogWrite(BLUE_LED, 0);
  }
}

void setup(void) {
  Serial.begin(9600);
  Serial.println("Serial Started");
  pinMode(PHOTO_PIN, INPUT);
  pinMode(TEMP_PIN, INPUT);
  pinMode(RED_LED, OUTPUT);
  pinMode(GREEN_LED, OUTPUT);
  pinMode(BLUE_LED, OUTPUT);
  pinMode(RELAY, OUTPUT);

  digitalWrite(RED_LED, LOW);
  digitalWrite(GREEN_LED, LOW);
  digitalWrite(BLUE_LED, LOW);
  digitalWrite(RELAY,LOW);
  //9-22-2010 I added this function to make the warming plate warm up once before switching on and off, that way I can turn it on, go get my coffee and come back with a warm plate to set it on.
  while(getTemp() < HIGH_TEMP)
  {
     if (!Relay_State)
     {
       digitalWrite(RELAY,HIGH); Relay_State = true;
       Debug();
     }
  }
}

void loop() {
  LEDColor();
  while (MugPresent())
  {
     RelayControl();
     Debug();
     LEDColor();
     delay(1600);
  }
  Debug();
  digitalWrite(RELAY, LOW); Relay_State = false;
  delay(1600);
}